Add storage cell software

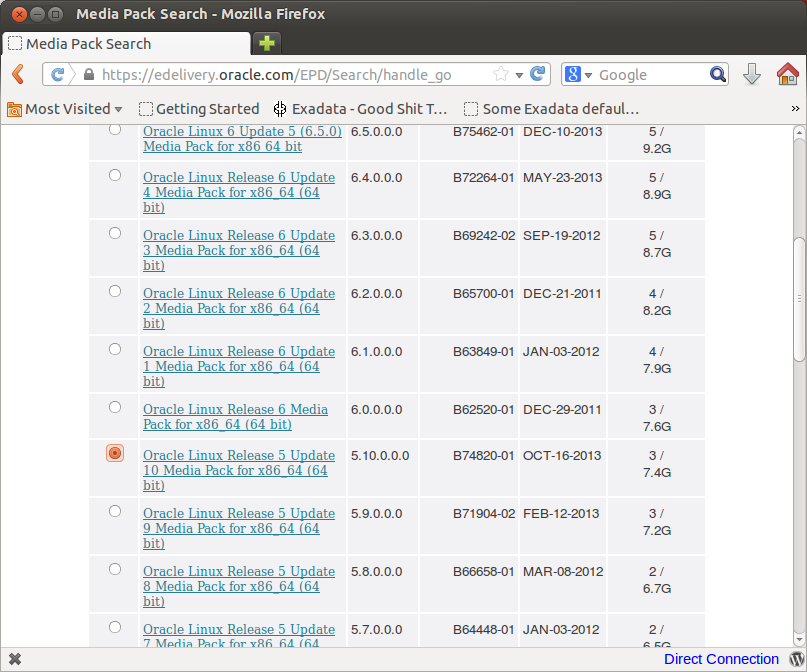
After uncompressing the V36290-01.zip file related to storage cell image I found a README.txt and a tar file computeImageMaker_11.2.3.2.1_LINUX.X64_130109-1.x86_64.tar that contains a folder named dl180. In these folder there is the sw needed to buid a bootable storage cell image.

I found lots of software and packages rpm. With a more deep view I could separate software into 3 groups: standard linux rpm probably already installed with OL5; software related to hardware and firmware; support tools for SUN and HP hardware. I didn’t need those software.

In the root path there is a cell.bin file that archive manager won’t open.
That file has some extra bytes in the header but gunzip is able to decompress it with just a warning about the header itself.

Here I found the only 1 interesting rmp package cell-11.2.3.2.1_LINUX.X64_130109-1.x86_64.rpm that contains the storage cell software. Plus a needed jdk’s install package jdk-1_5_0_15-linux-amd64.rpm.

Another interesting stuff was the doclib.zip with Exadata docs.

Install software as normal rpm, jdk before cell.

Here detailed steps. Or jump to end of post

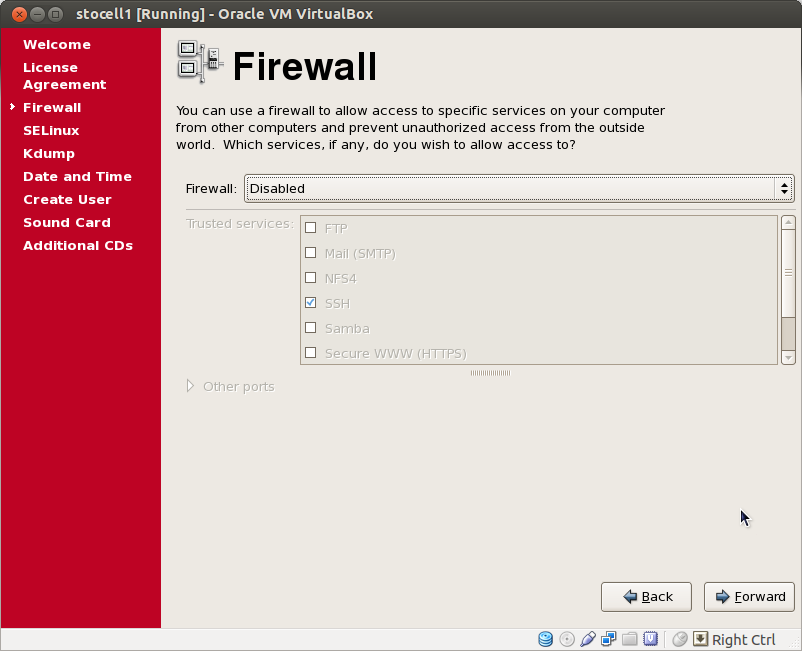
Check and eventually set host name resolution for local connection, needed by storage cell software. Don’t need to set name resolution for public and InfiniBand (!) network, but it could be done.

[root@stocell1 sf_OS]# vi /etc/hosts

[root@stocell1 sf_OS]# more /etc/hosts
# Do not remove the following line, or various programs
# that require network functionality will fail.
127.0.0.1       stocell1        localhost.localdomain localhost
::1             localhost6.localdomain6 localhost6

Put the software cell image zip (V36290-01.zip) in the path of host system choosed as shared folder so it can be directly used inside the VM. In fact there is a special file system mounted

[root@stocell1 ~]# mount

OS on /media/sf_OS type vboxsf (gid=160,rw)
[root@stocell1 ~]# cd /media/sf_OS/
[root@stocell1 sf_OS]# ll
total 1506576
-rwxrwx— 1 root vboxsf 1542729472 Oct 10 22:25 V36290-01.zip

Uncompress the file

[root@stocell1 sf_OS]# unzip V36290-01.zip
Archive:  V36290-01.zip
inflating: README.txt
inflating: cellImageMaker_11.2.3.2.1_LINUX.X64_130109-1.x86_64.tar

And then untar

[root@stocell1 sf_OS]# tar pxvf cellImageMaker_11.2.3.2.1_LINUX.X64_130109-1.x86_64.tar

(there are some errors due permissions on host folder, but there is no problem because the only file needed i cell.bin)

[root@stocell1 cellbits]# ll dl180/boot/cellbits/
total 1446844
-rwxrwx— 1 root vboxsf       729 Jan  9  2013 c7rpms.tbz
-rwxrwx— 1 root vboxsf 245231205 Jan  9  2013 cell.bin
-rwxrwx— 1 root vboxsf  12705374 Jan  9  2013 cellboot.tbz
-rwxrwx— 1 root vboxsf 141444416 Jan  9  2013 cellfw.tbz
-rwxrwx— 1 root vboxsf 142434203 Jan  9  2013 cellrpms.tbz
-rwxrwx— 1 root vboxsf 208612489 Jan  9  2013 commonos.tbz
-rwxrwx— 1 root vboxsf 375683818 Jan  9  2013 debugos.tbz
-rwxrwx— 1 root vboxsf  55704927 Jan  9  2013 doclib.zip
-rwxrwx— 1 root vboxsf 199485158 Jan  9  2013 exaos.tbz
-rwxrwx— 1 root vboxsf  18186084 Jan  9  2013 hputils.tbz
-rwxrwx— 1 root vboxsf  53387742 Jan  9  2013 kernel.tbz
-rwxrwx— 1 root vboxsf  16165382 Jan  9  2013 ofed.tbz
-rwxrwx— 1 root vboxsf  12485584 Jan  9  2013 sunutils.tbz

Then copy cell.bin and remove all

[root@stocell1 sf_OS]# cp dl180/boot/cellbits/cell.bin .
[root@stocell1 sf_OS]# rm -rf dl180
[root@stocell1 sf_OS]# rm -f cellImageMaker_11.2.3.2.1_LINUX.X64_130109-1.x86_64.tar README.txt
[root@stocell1 sf_OS]# ll
total 1746060
-rwxrwx— 1 root vboxsf  245231205 Dec 12 10:43 cell.bin
-rwxrwx— 1 root vboxsf 1542729472 Oct 10 22:25 V36290-01.zip

Now unzip cell.bin

[root@stocell1 sf_OS]# unzip cell.bin
Archive:  cell.bin
warning [cell.bin]:  6408 extra bytes at beginning or within zipfile
(attempting to process anyway)
inflating: cell-11.2.3.2.1_LINUX.X64_130109-1.x86_64.rpm
inflating: jdk-1_5_0_15-linux-amd64.rpm

Install jdk

[root@stocell1 sf_OS]# rpm -ivh jdk-1_5_0_15-linux-amd64.rpm
Preparing…                ########################################### [100%]
1:jdk                    ########################################### [100%]

Preparing to install cell rpm (thanks to Lee ..)

[root@stocell1 sf_OS]# mkdir /var/log/oracle
[root@stocell1 sf_OS]#chmod 775 /var/log/oracle

(It will be used also by celladmin user …)

Install cell sw

[root@stocell1 sf_OS]# rpm -ivh cell-11.2.3.2.1_LINUX.X64_130109-1.x86_64.rpm
Preparing…                ########################################### [100%]
Pre Installation steps in progress …
1:cell                   ########################################### [100%]
Post Installation steps in progress …
Set cellusers group for /opt/oracle/cell11.2.3.2.1_LINUX.X64_130109/cellsrv/deploy/log directory
Set 775 permissions for /opt/oracle/cell11.2.3.2.1_LINUX.X64_130109/cellsrv/deploy/log directory
/
/
Installation SUCCESSFUL.
Starting RS and MS… as user celladmin
Done. Please Login as user celladmin and create cell to startup CELLSRV to complete cell configuration.
WARNING: Using the current shell as root to restart cell services.
Restart the cell services using a new shell.

Next: Prepare some virtual disks

/*+ esp */

Start and use storage cell software to configure cell disks, flash disks, grid disks

To start the software (correctly) and use it to configure cell/grid/flash disks the number of open file descriptors must be increased (a very clear error will be raised otherwise).

As it found googling edit the /etc/sysctl.ctl and add/set

fs.file-max = 65536

and edit the /etc/security/limit.conf files and add/set

* soft nofile 65536
* hard nofile 65536

To communicate over InfiniBand Oracle uses rds protocol. All the modules of rds must be loaded (and configured to be loaded over machine restarts)

[root@stocell1 ~]# modprobe rds
[root@stocell1 ~]# modprobe rds_tcp
[root@stocell1 ~]# modprobe rds_rdma

and permanently editing/creating rds.conf

[root@stocell1 ~]# vi /etc/modprobe.d/rds.conf

insert line

install rds /sbin/modprobe –ignore-install rds && /sbin/modprobe rds_tcp && /sbin/modprobe rds_rdma

[EDIT: pay attention to double “–” that sometimes became a single char “–”]
Now, as celladmin user the storage cell software could be started

[root@stocell1 ~]# su – celladmin
[celladmin@stocell1 ~]$ cellcli -e alter cell restart services allStopping the RS, CELLSRV, and MS services…
CELL-01509: Restart Server (RS) not responding.
Starting the RS, CELLSRV, and MS services…
Getting the state of RS services… running
Starting CELLSRV services…
The STARTUP of CELLSRV services was not successful.
CELL-01547: CELLSRV startup failed due to unknown reasons.
Starting MS services…
The STARTUP of MS services was successful.

The error in not unknown (as stated) but well known and expected

[Required IP parameters missing]

🙂

So, set the interconnect (= InfiniBand connection) and …

[celladmin@stocell1 ~]$ cellcli -e create cell stocell1 interconnect1=eth1
Cell stocell1 successfully created
Starting CELLSRV services…
The STARTUP of CELLSRV services was successful.
Flash cell disks, FlashCache, and FlashLog will be created…
CellDisk FD_00_stocell1 successfully created
CellDisk FD_01_stocell1 successfully created
CellDisk FD_02_stocell1 successfully created
CellDisk FD_03_stocell1 successfully created
CellDisk FD_04_stocell1 successfully created
CellDisk FD_05_stocell1 successfully created
Flash log stocell1_FLASHLOG successfully created
Flash cache stocell1_FLASHCACHE successfully created

(I’m not sure why Flash components are auto configured, but it can be modified later if needed)
Configure cell disks

[celladmin@stocell1 ~]$ cellcli -e create celldisk all
CellDisk CD_DISK01_stocell1 successfully created
CellDisk CD_DISK02_stocell1 successfully created
CellDisk CD_DISK03_stocell1 successfully created
CellDisk CD_DISK04_stocell1 successfully created
CellDisk CD_DISK05_stocell1 successfully created
CellDisk CD_DISK06_stocell1 successfully created
CellDisk CD_DISK07_stocell1 successfully created
CellDisk CD_DISK08_stocell1 successfully created
CellDisk CD_DISK09_stocell1 successfully created
CellDisk CD_DISK10_stocell1 successfully created
CellDisk CD_DISK11_stocell1 successfully created
CellDisk CD_DISK12_stocell1 successfully created

and grid disks

[celladmin@stocell1 ~]$ cellcli -e create griddisk all harddisk prefix=DATA
GridDisk DATA_CD_DISK01_stocell1 successfully created
GridDisk DATA_CD_DISK02_stocell1 successfully created
GridDisk DATA_CD_DISK03_stocell1 successfully created
GridDisk DATA_CD_DISK04_stocell1 successfully created
GridDisk DATA_CD_DISK05_stocell1 successfully created
GridDisk DATA_CD_DISK06_stocell1 successfully created
GridDisk DATA_CD_DISK07_stocell1 successfully created
GridDisk DATA_CD_DISK08_stocell1 successfully created
GridDisk DATA_CD_DISK09_stocell1 successfully created
GridDisk DATA_CD_DISK10_stocell1 successfully created
GridDisk DATA_CD_DISK11_stocell1 successfully created
GridDisk DATA_CD_DISK12_stocell1 successfully created

Work done!

Thanks to Steven Lee. His post on the same issue gave me the solution for 2 problems:
– the needed path /var/log/oracle found using the method suggested by Lee
– a strange memory problem with 4GB RAM that was solved simply resizing RAM to 2GB (according with some answers of Lee)
Furthermore the differences between my VM ad his VM helped me to fix the problem related to rds modules (that probably evolved in the meantime)

/*+ esp */

Prepare some virtual disks

EDIT 2014 Jun 11: 12c is more angry. Use at least 1GB file size. esp

The storage cell software installed and some disks must be created.

Shutdown the machine and with VirtualBox Settings create all the disks: 12 with size 500M (data) and 6 with size 400M (flash)

createVboxDisk1

Choose create a new one, dynamical

createVboxDisk2

with size 500MB.

createVboxDisk3

Repeat 17 more times…  and restart the VM

After storage cell software install some changes in gnome environment produce this strange behaviour

nologin

Calm down, is just a profile problem. Switch to failsafe session

filesafe

and log again in an xterm

xterm

and edit /etc/bashrc

[root@stocell1]# vi /etc/bashrc

…..

export DISPLAY=:0

Save, exit and login again.

Now identify disks

[root@stocell1 ~]# fdisk -l 2>/dev/null |grep “B,”
Disk /dev/sda: 26.8 GB, 26843545600 bytes
Disk /dev/sdb: 524 MB, 524288000 bytes
Disk /dev/sdc: 524 MB, 524288000 bytes
Disk /dev/sdd: 524 MB, 524288000 bytes
Disk /dev/sde: 524 MB, 524288000 bytes
Disk /dev/sdf: 524 MB, 524288000 bytes
Disk /dev/sdg: 524 MB, 524288000 bytes
Disk /dev/sdh: 524 MB, 524288000 bytes
Disk /dev/sdi: 524 MB, 524288000 bytes
Disk /dev/sdj: 524 MB, 524288000 bytes
Disk /dev/sdk: 524 MB, 524288000 bytes
Disk /dev/sdl: 524 MB, 524288000 bytes
Disk /dev/sdm: 524 MB, 524288000 bytes
Disk /dev/sdn: 419 MB, 419430400 bytes
Disk /dev/sdo: 419 MB, 419430400 bytes
Disk /dev/sdp: 419 MB, 419430400 bytes
Disk /dev/sdq: 419 MB, 419430400 bytes
Disk /dev/sdr: 419 MB, 419430400 bytes
Disk /dev/sds: 419 MB, 419430400 bytes
Disk /dev/dm-0: 22.5 GB, 22515023872 bytes
Disk /dev/dm-1: 4194 MB, 4194304000 bytes

(500MB data, 400MB flash)

Looking at environment of the new celladmin user, it could be found an interesting variable that define where the cellsrv process will search for disks:

[root@stocell1 unix]# echo $T_WORK
/opt/oracle/cell11.2.3.2.1_LINUX.X64_130109/disks

Under that path a new folder is needed (raw) and symbolic link to “real” disks should be created

cd /opt/oracle/cell11.2.3.2.1_LINUX.X64_130109/disks
mkdir disks
mkdir disks/raw
cd disks/rawln -s /dev/sdb stocell1_DISK01
ln -s /dev/sdc stocell1_DISK02
ln -s /dev/sdd stocell1_DISK03
ln -s /dev/sde stocell1_DISK04
ln -s /dev/sdf stocell1_DISK05
ln -s /dev/sdg stocell1_DISK06
ln -s /dev/sdh stocell1_DISK07
ln -s /dev/sdi stocell1_DISK08
ln -s /dev/sdj stocell1_DISK09
ln -s /dev/sdk stocell1_DISK10
ln -s /dev/sdl stocell1_DISK11
ln -s /dev/sdm stocell1_DISK12
ln -s /dev/sdn stocell1_FLASH01
ln -s /dev/sdo stocell1_FLASH02
ln -s /dev/sdp stocell1_FLASH03
ln -s /dev/sdq stocell1_FLASH04
ln -s /dev/sdr stocell1_FLASH05
ln -s /dev/sds stocell1_FLASH06

Next: Start and use storage cell software to configure cell disks, flash disks, grid disks

/*+ esp */

Install an Oracle Linux 5 node

This is quite easy.
On my Ubuntu 13.04 was already installed VirtualBox.

I created a VM with 1 core, 25GB of virtual disk and 2GB RAM (I started with 4GB but now I suggest 2GB, later will be clear the reason), but probably 1GB is enough [EDIT: no. with just 1GB doesn’t start cellsrv, even if set initstate to 3 to save GUI overhead}. To avoid future problems with dynamic network configurations, I choose to have 2 networks: one for world connections, dynamically configured; one to emulate InfiniBand network, static inside my laptop using a dedicate VirtualBox network adapter and an host only setup for the VM.

On my VM I attached the ISO file ad bootable DVD and the guided installation starts with VM boot.
I did a few choices: I used entire disk, I didn’t customize locales, I leave DHCP enabled for eth0 and I put my static IP address/netmask/gateway (192.168.10.20/255.255.255.0/192.168.10.1) on eth1, I disabled firewall, I installed developer packages and avoided http server and so on.
The VM installed with no problem and I was able to login as root. I installed Guest Addictions to use shared forlders (VirtualBox feature). I put all the software I need on a shared folder so I could limit the size of VM’s virtual disk. To set Guest Addictions and shared folder I needed some reboot.
I further change the init level to 3 (edit inittab) to save memory – no GUI 😐 and fixed some network problem with eth1.

Here detailed steps. Or jump to next step

Start VirtualBox and select File->Preferences

VBnewsub

Select Network and add an host only network adapter

VBnewsub1

choose subnet values

VBnewsub2

leave DHCP setting default (I didn’t use it)

VBnewsub3

create a new host (stocell1)

newhost

with 2GB RAM

newhostRAM

and 25GB virtual disk dynamically allocated

newhostDISK

Then in VM settings create 2 virtual network card, 1 to simulate network and 1 to simulate InfiniBand

linuxNETeth0

linuxNETeth1

and “insert” the Oracle Linux 5 bootable installation DVD

newhostDVD

newhostDVDm

Start the VM, enter key to boot, skip disk test, choose graphical install and begin installation

Press next to begin, next for English language, choose your keyboard and next

Press Ok on disk warning (the disk is unused so there is no partition table).

Choose to use the entire disk

linuxDISK

Set name and network manually

–Retake snapshot eth0 DHCP, eth1 manual

Choose region and then some extra

linuxAddOn

and confirm installation to start the process

linuxInstall

Completed

linuxComplete

After reboot some few steps to customize the VM

afewsteps1

Ok on license agreement, disable firewall

afewsteps2-fw

and SELinux

afewsteps3-sl

Set time, choose root pwd and reboot.

I found some extra problems with network under Unbreakable Enterprise Kernel (uek5) and with the update service, so as root (my only account!) do

[root@stocell1 ~]# vi /etc/grub

and set the default kernel to Enterprise Linux (el5) modifying default from 0 to 1

default=1

and to avoid unnecessary updates install do

[root@stocell1 ~]# service yum-updatesd stop[root@stocell1 ~]# chkconfig yum-updatesd off

Reboot again

Then install VirtualBox Guest Additions. Select stocell1 VM then

installGA1

In a terminal, run

[root@stocell1 ~]# yum install kernel-uek-devel

to have all the sources needed and then run autorun.sh as soon as will be mounted and open the Guest Additions ISO image.

installGA2

Define a shared forder to transfer rpm from host to guest OS

setSF1

and set automount

setSF2

Reboot! Now your node is up and ready for storage cell software install.

Next: Add storage cell software

/*+ esp */

Exadata Virtual Test Environment for OCE Prep – storage cell node

As I can read on Oracle site, presentations and notes, usually there is no needs to install storage cell for a real Exadata environment.
By the way on eDelivery site Oracle made available storage cell node images for recovering purposes.
Those images install only on Exadata hardware because check hardware and firmware multiple times. With time and effort it should be possible to remove all those checks, but (luckily) I do not need it.
Images contain the relevant software components (rpm packages) to build a storage cell node.
So the way is
install an Oracle Linux 5 node (probably most Red Hat derivates fit)
add storage cell software
prepare some virtual disks (… files!)
start and use storage cell software to configure cell disks, flash disks, grid disks

Before start building I downloaded from eDelivery Oracle Linux 64 bit 5.10 (V40139-01.iso)

eDelivery-Linux5

and the storage cell image for HP DL180 (V36290-01.zip).
eDelivery-cell

Next: Install an Oracle Linux 5 node

/*+ esp */

Exadata Virtual Test Environment for OCE Prep

Let’s start.
Differently from a standard database environment Exadata is an engineered database machine with 3 major component: database nodes, storage cell nodes and InfiniBand network between those elements.
For studying and testing purposes I need to emulate as good as I can such complex machine to be able to put my hands on principal topics of OCE exam.
I know that I will never have an Exadata on my laptop, but I think and hope to have an useful tool for my target.

The infiniband network “simply” adds performance, then I can emulate it by a functional point of view with a ethernet network (emulated) .
I need one virtual machine for one database node and another virtual machine for one storage cell node.

My laptop has an Intel i3 and 8GB RAM. The operating system installed is an Ubuntu 13.04 64 bit and that the choice for virtualization is VirtualBox 4.2.20

Here the steps to build the storage cell node

Here the steps to build the database node and assembly the Exadata Virtual Test Environment

/*+ esp */